
Gravitational Waves Detection — Kaggle Competition — Keras Modelling — Part-2

In the first part of this Blog series on Kaggle Competition for G2Net Gravitational Wave Detection I discussed the introduction on Gravitational waves, fundamentals of digital signal processing.
In this part-2, I will be doing simple EDA on this dataset and building a baseline ConvNet Model with Keras.
My YouTube Video Explaining the model building for Kaggle Submission.
Introduction of this Kaggle Challenge
In this competition, you are provided with a training set of time series data containing simulated gravitational wave measurements from a network of 3 gravitational wave interferometers (LIGO Hanford, LIGO Livingston, and Virgo). Each time series contains either detector noise or detector noise plus a simulated gravitational wave signal. The task is to identify when a signal is present in the data (target=1).
So we need to use the training data along with the target value to build our model and make predictions on the test IDs in form of probability that the target exists for that ID.
So basically data-science helping here by building models to filter out this noises from data-streams (which includes both noise frequencies and Gravitational Waves frequencies) so we can single out frequencies for Gravitational-Waves.
Basic Description of the Data Provided
We are provided with a train and test set of time series data containing simulated gravitational wave measurements from a network of 3 gravitational wave interferometers:
LIGO Hanford
LIGO Livingston
Virgo
Each time series contains either detector noise or detector noise plus a simulated gravitational wave signal.
The task is to identify when a signal is present in the data (target=1).
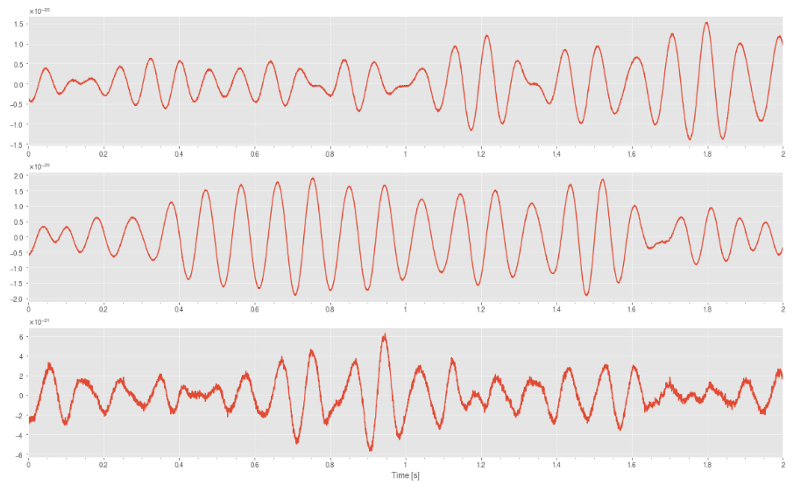
Each .npy data file contains 3 time series (1 coming for each detector) and each spans 2 sec and is sampled at 2,048 Hz.
And we have a total of 5,60,000 files, each file of dimension of 3 * 4096, this turns out to be a huge time series
Initial loading of all libraries.
What are all these 5.6 million .npy files ?
It is a standard binary file format for persisting a single arbitrary NumPy array on disk. The format stores all of the shape and data type information necessary to reconstruct the array correctly even on another machine with a different architecture. The format is designed to be as simple as possible while achieving its limited goals. The implementation is intended to be pure Python and distributed as part of the main numpy package.
Timeseris with gwpy package.
Load the .npy files from all the nested folder-structure and get the ids from file names
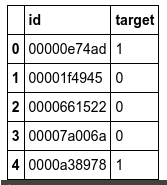
train_labels = pd.read_csv(root_dir + "/training_labels.csv") print(Fore.YELLOW + 'Dataset has ', Style.RESET_ALL + "{} Observations".format(train_labels.shape[0]) )
print(Fore.MAGENTA + "Printing first 5 Labels: ", Style.RESET_ALL ) display(train_labels.head())
Dataset has 560000 Observations
Printing first 5 Labels:
Construct a Training dataframe for all the available .npy files
Get all the file file path from all 4-labels of nested folder structure_
files_paths = glob(root_dir + '/train////')
''' The glob module finds all the pathnames matching a specified pattern according to the rules used by the Unix shell, although results are returned in arbitrary order. No tilde expansion is done, but *, ?, and character ranges expressed with [] will be correctly matched. We can use glob to search for a specific file pattern, or perhaps more usefully, search for files where the filename matches a certain pattern by using wildcard characters.
'''
get the list of ids from the .npy files_
ids_from_npy_files = [path.split("/")[-1].split(".")[0] for path in files_paths]
[-1] means the last element in a sequence,_
print(ids_from_npy_files)_
get a dataframe with paths and ids of those .npy files_
df_path_id = pd.DataFrame({'path': files_paths, 'id':ids_from_npy_files}) df_path_id.head()
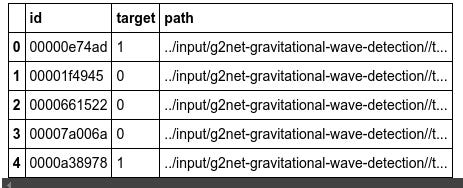
merging that above df with the target_
df_train = pd.merge(left=train_labels, right=df_path_id, on='id') display(df_train.head())
verifying the shape of the merged df has 5,60,000 rows and 3 columns_
df_train.shape
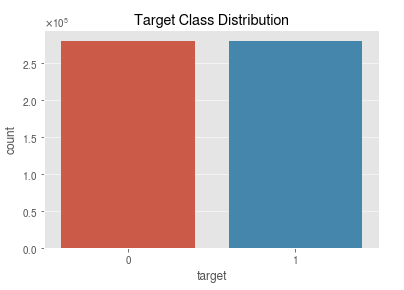
Classify the the 2 classes of targets of 1 and 0_
target_1_df_train = df_train[df_train.target == 1] target_0_df_train = df_train[df_train.target == 0]
sns.countplot(x = 'target' , data=train_labels) plt.title('Target Class Distribution')
Plotting (KDE, Boxplot, and Timeseries)
As we are provided with a train and test set of time series data from a network of 3 gravitational wave interferometers:
LIGO Hanford
LIGO Livingston
Virgo
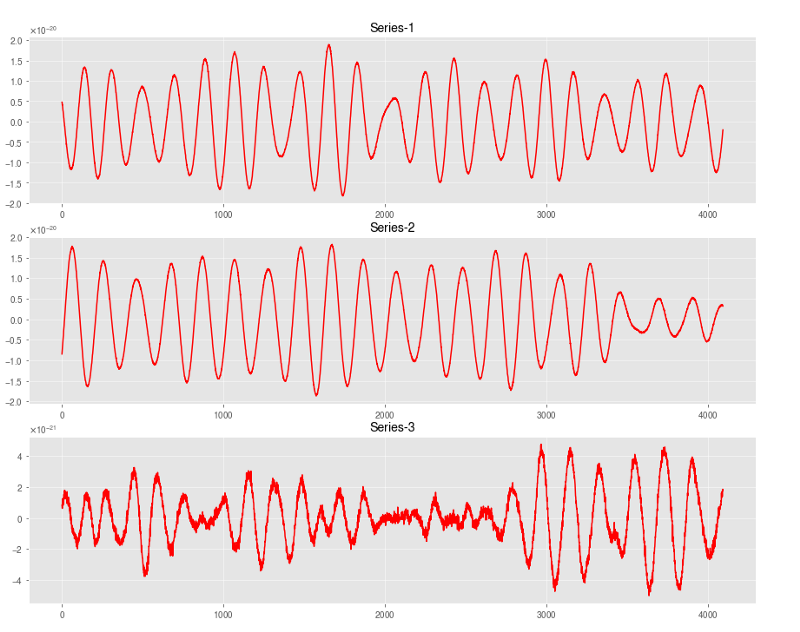
Extract 1 random element from the target_1_df_train_
using random_state to ensure the reproducibility of the examples._
target_1_rand_sample_file = target_1_df_train.sample(1).path.values[0] print(target_1_rand_sample_file)
selected_rand_series_1 = np.load(target_1_rand_sample_file)
multi_plot(selected_rand_series_1, 'time', "1")
multi_plot(selected_rand_series_1, "box", "1")

multi_plot(selected_rand_series_0, 'box', "0")

Basic observation from Box Plots:
The 3 series from the 3 Interferometer have fairly similar distribution for both the class types.
multi_plot(selected_rand_series_1, 'kde', "1")

multi_plot(selected_rand_series_0, 'kde', "0")

Now building a baseline Keras Model
Note on Keras Sequential model
There are two ways to build Keras models: sequential and functional.
The sequential API allows you to create models layer-by-layer for most problems. It is limited in that it does not allow you to create models that share layers or have multiple inputs or outputs. In short, you create a sequential model where you can easily add layers, and each layer can have convolution, max pooling, activation, drop-out, and batch normalization.
Alternatively, the functional API allows you to create models that have a lot more flexibility as you can easily define models where layers connect to more than just the previous and next layers. In fact, you can connect layers to (literally) any other layer. As a result, creating complex networks such as siamese networks and residual networks become possible.
From the definition of Keras documentation the Sequential model is a linear stack of layers. You can create a Sequential model by passing a list of layer instances to the constructor. The common architecture of ConvNets is a sequential architecture. However, some architectures are not linear stacks. For example, siamese networks are two parallel neural networks with some shared layers.
With the Sequential Models, you need to ensure the input layer has the right number of inputs. Assume that you have 3,072 input variables; then you need to create the first hidden layer with 512 nodes/neurons. In the second hidden layer, you have 120 nodes/neurons. Finally, you have ten nodes in the output layer. For example, an image maps onto ten nodes that shows the probability of being label1 (airplane), label2 (automobile), label3 (cat), …, label10 (truck). The node of highest probability is the predicted class/label.
Some common layer types in Keras are as follows:
Dense: This is a fully connected layer in which all the nodes of the layer are directly connected to all the inputs and all the outputs. ANNs for classification or regression tasks on tabular data usually have a large percentage of their layers with this type in the architecture.
Convolutional: This layer type creates a convolutional kernel that is convolved with the input layer to produce a tensor of outputs. This convolution can occur in one or multiple dimensions. ANNs for the classification of images usually feature one or more convolutional layers in their architecture.
Pooling: This type of layer is used to reduce the dimensionality of an input layer. Common types of pooling include max pooling, in which the maximum value of a given window is passed through to the output, or average pooling, in which the average value of a window is passed through. These layers are often used in conjunction with a convolutional layer, and their purpose is to reduce the dimensions of the subsequent layers, allowing for fewer training parameters to be learned with little information loss.
Recurrent: Recurrent layers learn patterns from sequences, so each output is dependent on the results from the previous step. ANNs that model sequential data such as natural language or time-series data often feature one or more recurrent layer types.
There are other layer types in Keras; however, these are the most common types when it comes to building models using Keras.
Why I would need a Custom Data Generator Function for Keras Sequential Model building
The key reason is to be able to handle large data with batching, so the RAM/CPU/GPU does not need to handle the full data at once, which will anyway not be possible for this 72GB dataset.
So basically, since our code will in most cases be multicore-friendly, so we focus on doing more complex operations (e.g. computations from source files) without worrying about data generation becoming a bottleneck in the training process.
DataGenerator(Sequence) => Now, let’s go through the details of how to set the Python class DataGenerator, which will be used for real-time data feeding to your Keras model. We make DataGenerator inherit the properties of keras.utils.Sequence so that we can leverage nice functionalities such as multiprocessing.
While we have built-in Data Generator like ImageDataGenerator, we still need a plethora of custom Generator function. Because, Model training is not limited to a single type of input and target. There are times when a model is fed with multiple types of inputs at once. For example, say in a multi-modal classification problem which needs to process text and image data simultaneously. Here, obviously we cannot use ImageDataGenerator. Hence, we need a custom data generator.
According to Keras Documentation — Every Sequence must implement the __getitem__ and the __len__ methods. If you want to modify your dataset between epochs you may implement on_epoch_end. The method getitem should return a complete batch.
A note on yield function with respect to the custom data generator here for Sequence API of Keras
Here I am using the Sequence API, which works a bit different than plain generators. In a generator function, you would use the yield keyword to perform iteration inside a while True: loop, so each time Keras calls the generator, it gets a batch of data and it automatically wraps around the end of the data.
But in a Sequence-API, there is an index parameter to the __getitem__ function, so no iteration or yield is required, this is performed by Keras for you. This is made so the sequence can run in parallel using multiprocessing, which is not possible with old generator functions.
Difference between fit() and fit_generator() in Keras
In Keras, using fit() and predict() is fine for smaller datasets which can be loaded into memory. But in practice, for most practical-use cases, almost all datasets are large and cannot be loaded into memory at once. The solution is to use fit_generator() and predict_generator() with custom data generator functions which can load data to memory during training or predicting.
In keras, fit() is much similar to sklearn’s fit method, where you pass array of features as x values and target as y values. You pass your whole dataset at once in fit method. Also, use it if you can load whole data into your memory (small dataset).
In fit_generator(), you don’t pass the x and y directly, instead they come from a generator. As it is written in keras documentation, generator is used when you want to avoid duplicate data when using multiprocessing. This is for practical purpose, when you have large dataset.
Finally building the Keras Layers
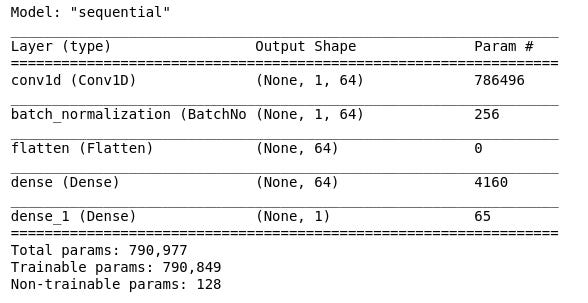
Running for 1 epoch took almost 2 and half hours and got me a baseline score of 0.48